Power and Setup
Turning On Equipment
- Locate the touch panel in the grey lock box
- Open the lock box

- If the system doesn't awake, tap the screen
- Tap the Start button

- The system will begin turning on

Turning Off Equipment
- Locate the touch panel in the grey lock box
- Open the lock box
- If the system doesn't awake, tap the screen
- Tap the Off button in the bottom right of the screen

- Confirm you want to shut down by clicking the Power Down button

- The system will begin shutting down and will return to the start screen when complete

Connect Lectern to Wall Input
Connecting the cables to the Wall Inputs
- Locate the wall inputs under the touch panel
- Connect the Red, Green, Orange, and Blue cables to the corresponding colors on the inputs

- On the top of the lectern, open the Cable Cubby and pull out the HDMI Cable (black cable) and Ethernet Cable (green cable)

- Connect the HDMI cable to the HDMI port on the laptop

- Connect the Ethernet cable to the Ethernet port on the laptop
- Choose Lectern Wall from the top of the screen inputs

- The projector will turn on and screen will begin to come down
Disconnecting the cables from the inputs
- On each input there is a silver tab
- Press the tab

- While pressing the tab, pull the cable out from the input

Connect Lectern to Wall HDMI Only
Connecting the cables to the Wall Inputs
- Locate the wall inputs under the touch panel
- Connect the HDMI cable to the HDMI input

- The yellow light will turn green when a signal is present
- Choose Wall HDMI Input from the top of the screen inputs

- The projector will turn on and screen will begin to come down
Connect Lectern to Floor Input
Connecting the cables to the Wall Inputs
- Locate the floor inputs in the middle of the gym, near the bleachers

- Connect the Red and Green cables to the corresponding colors on the inputs

- Connect the Orange and Blue cables to the corresponding colors on the inputs

- On the top of the lectern, open the Cable Cubby and pull out the HDMI Cable

- Connect the HDMI cable to the HDMI port on the laptop

- Connect the Ethernet cable to the Ethernet port on the laptop
- Choose Lectern Floor Box from the top of the screen inputs

- The projector will turn on and screen will begin to come down
Disconnecting the cables from the inputs
- On each input there is a silver tab
- Press the tab
- While pressing the tab, pull the cable out from the input
Disconnect Equipment
- On each input there is a silver tab
- Press the tab
- While pressing the tab, pull the cable out from the input
Video
Adjusting Projector & Screen
Projector Controls
Under the Projector section, is where you can turn on, turn off, or picture mute the projector.
- On button - Turns the Projector On
- Off button - Turns the Projector Off
- Mute button - Blacks out the projector screen, but leaves it on

Screen Controls
Under the Projector section and tap the gear
- Choose the △ button to make the screen go up
- Choose the ▽ button to make the screen go down
- Choose the Stop button to stop the screen wherever it is

To leave the screen control, tap the X in the top right of the screen.
Audio
Adjusting Volume
Table of Contents
Master Volume ControlsAudio Control Button Adjusting an Individual VolumeSpeaker Control Button ZonesMaster Volume Controls
Here is where you can adjust the volume as a whole, this will include the HDMI input, Bluetooth and Microphones.
- The bar on the left, it the volume indicator
- Best Practices: Leave it about 75%
- Choose the △ button to make the volume louder
- Choose the ▽ button to make the volume softer
- Choose the Mute button to mute the sound

Audio Control Button
Here is where you can adjust the individual volume of each input, this will include the HDMI input, Bluetooth and Microphones. 
Adjusting an Individual Volume of a Device
By default, all devices are muted.
- The bar on the left, it the volume indicator for that input
- Best Practices: Leave it about 65%
- Choose the △ button to make the volume louder
- Choose the ▽ button to make the volume softer
- Choose the Mute button to mute the sound
- Red mute button is Muted
- Grey mute button is Unmuted

To leave the volume control, tap the X in the top right of the screen.
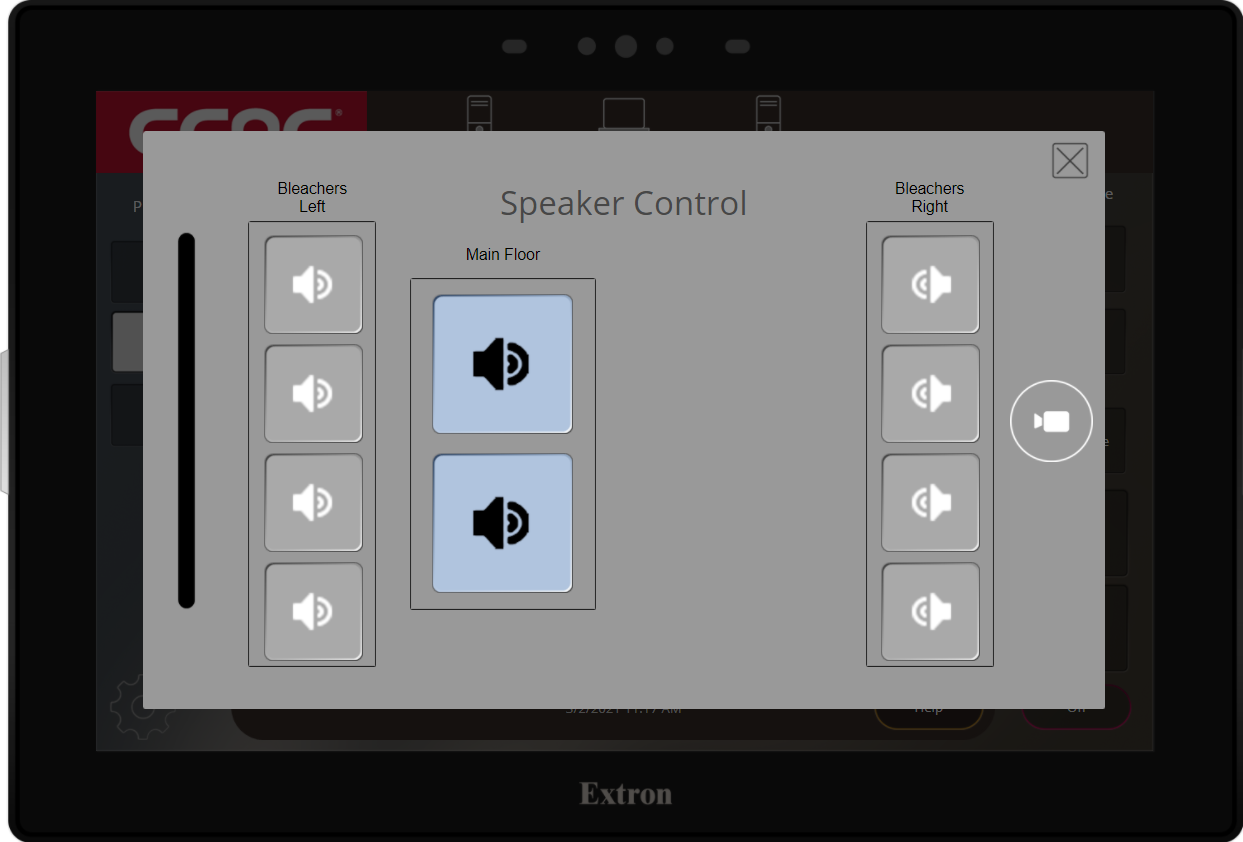
Speaker Control Button
The Boyce gymnasium is setup in 3 speaker zones. All zones can be playing sound or just 1 zone, or 2 zones.

Zones
- Bleacher Left - Speakers where the bleachers are under the projector screen
- Main Floor - Speakers that play sound into the center court
- Bleacher Right - Speakers where the bleachers are under the projector
- Zones that are ON are Blue
- Zones that are OFF are Grey

To leave the speaker control, tap the X in the top right of the screen.
Examples:
- Presentation (Pictured Below): Main Floor only
- Presentation with Overflow: Main Floor and Bleacher Right
- Sports Game: Bleacher Left and Bleacher Right
Connect Using Bluetooth
Table of Contents
Pairing the DeviceAdjusting the volume of the Bluetooth deviceTroubleshooting TipsPairing the Device
- Locate the Bluetooth receiver under the touch panel

- Press and hold the PAIR button for 3 seconds, the blue light will begin to flash when pair mode is on

- From the device you want to connect, locate the Bluetooth settings
- Tap or click on unBT2A

- Pairing will happen, your device will say it's pair successfully
Adjusting the volume of the Bluetooth device
- From the touch panel, tap Audio Control

- Locate the Bluetooth volume buttons

- Choose the △ button to make the volume louder

- Choose the ▽ button to make the volume softer

- Choose the Mute button to mute the sound

Troubleshooting Tips
If you cannot connect to the Bluetooth device, try the follow:
- Make sure no one else is already connected to the Bluetooth
- Try re-pairing the device again
- Restart the device that is trying to pair to the Bluetooth receiver
Equipment List
Equipment Information
Table of Contents
LecternMicrophonesTouch PanelWall and Floor Inputs Wall Location Floor LocationBluetooth Receiver

Lectern
Location
- Located in the right closet
- Security will need to unlock the closet
Features
- Lectern Microphone
- Cable Cubby on top of lectern
- HDMI Cable
- Ethernet (Internet/Network) Cable
- Audio and Video Connection Cables
- Velcro Cable Wrap
 Microphones
Location
- Located at the Main Security Office
- You will need a Photo ID to rent out
Features
- 2 Microphones
- Each is Labeled
- Wireless 1
- Wireless 2
- Wireless Handhelds
- Automatically turned on
- Automatically unmuted
- Will need unmuted on the touch panel
 Touch Panel
-
Location
- Left side wall of the right closet where lectern is stored
- Inside grey lock box
- Access key is connected to the lock box
-
Features
- Auto awakes
- Allows you to control the projector/video and microphones & input/audio
- Controls to power off the system
 Wall and Floor Inputs
-
Wall Location
- Left side wall of the right closet where lectern is stored
- Under the touch panel
-
Floor Location
- Middle of the gym
- Near bleachers
- Along with scoreboard input
-
Features
- Allows you to connect audio and video to the projector/video and microphones & input/audio
- Cables and inputs are color coded and labeled
 Bluetooth Receiver
-
Location
- Under the touch panel
-
Features
- Allows you to pair a device to use Bluetooth audio